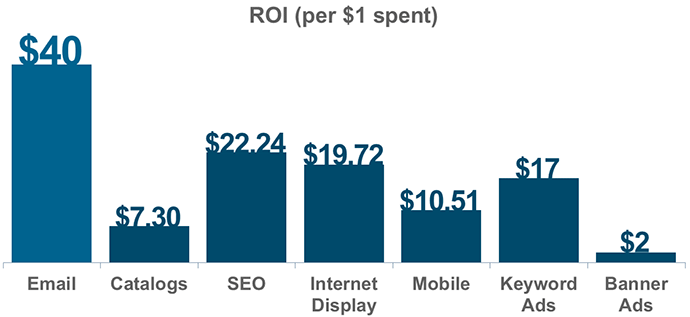
If you are not aware of this already, then you need to know that email marketing produces the highest ROI of any type of marketing or advertising out there. Adobe broke down the actual stats and found that the average ROI of email marketing is almost at $40 to every single dollar that is invested in it.
When executing at a high level, the only costs that you have to deal with are from your email marketing company and your email opt-in software. This makes it real easy to get a huge return.
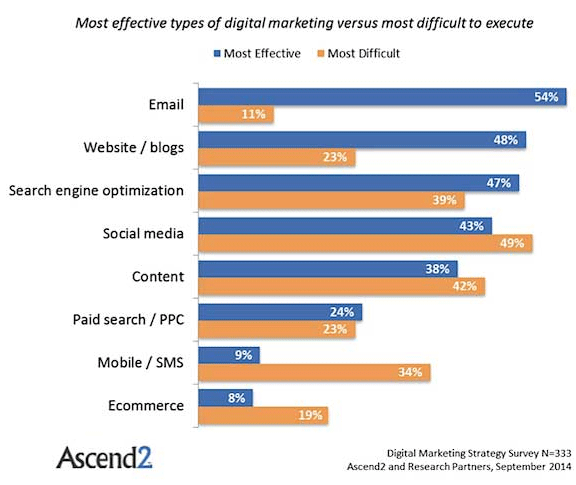
A recent survey by Ascend asked the top digital marketing strategists two questions…
What are the most effective types of digital marketing?
Which types of digital marketing tactics are the easiest to execute?
The top three most effective types of digital marketing were email, blogs, and SEO. This is all good news for all of us that run a blog because the blog is at the heart of all three of these. The winner for the easiest tactic to execute was email. So email marketing is both the most effective form of digital marketing while also being the easiest to execute.
Yes, compared to everything else email marketing is a lot easier to execute, but you have to know the core strategies that get the best results. And lying right at the core is your email list building strategy. To build an email list, you need to master the art of creating and placing email opt-ins on your website.
Pro bloggers have an email opt-in conversion rate of up to 20 times greater than amateur bloggers because they strategically place their opt-in lead magnets in four key locations on their blog.
Today I am going to reveal these locations and just exactly how to optimize each one so that you can supercharge the growth rate of your email list.
#1 The Incredible and Misunderstood Popup Email Capture
When it comes to conversion rates nothing comes close to the popup. The problem is that most bloggers are afraid to use it in the fear that it will alienate their visitors. This fear is usually based upon on preconceived notion of what a pop up used to be. You remember all of those intrusive ads for questionable products that seemed to take over our browser and infect our computers with malware.
Those days are long gone, but the memories still remain. As a blogger, you need to face this fear straight on and overcome it because you are handicapping your email list with everyday that you wait to add a popup email capture.
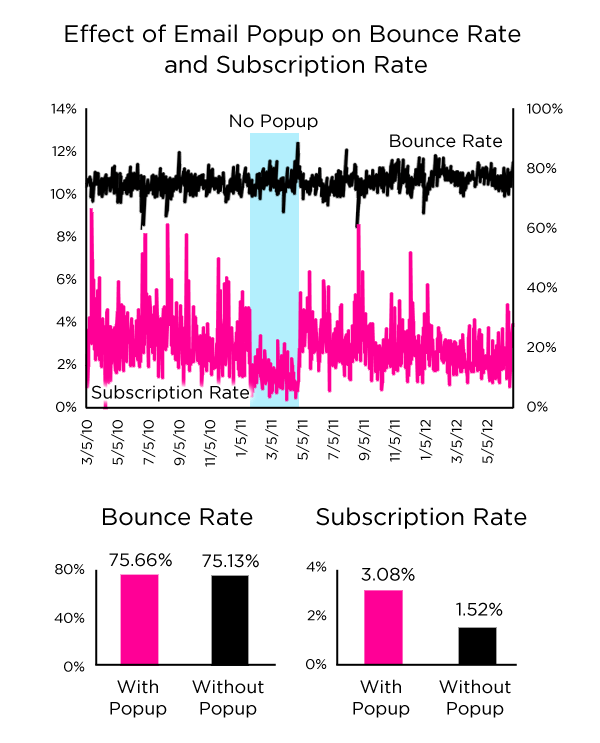
Let me take you through some real statistics to alleviate any concerns that might cause for reservation in placing your first popup. A pretty famous blogger did a four month study on the effect of the email popup on bounce rates. For those of you that do not know what bounce rate is, it is a key analytics statistic that is used to identify when content on a specific post causes visitors to leave the website completely. The higher the bounce rate, the bigger the problem.
Let’s get back to the statistics. Over a four month period, Dan Zarrella disabled the opt-in popup window on his blog. He found that during this time that the bounce rate was completely unaffected and stayed the same. However, the amount of email opt-ins that his blog received during this four months period was cut in half. This study proves that there are absolutely no negative consequences from having an email popup window on your blog.
Now that we have covered all our bases in regards to the false preconceptions of popups, let’s go ahead and move into the most effective way to use them on your blog.
There are two tactics that are used for the implementation of a popup window. The first and most effective tactic is known as the timed popup window. This means that you will program the popup window to show up after a specific period of time.
Almost all email capture software allows you to program the popup window to show up after a certain amount of seconds after a new visitors comes to your blog for the very first time. The amount of seconds that you choose can make a humongous difference on the overall conversion rate of the the popup email capture.
There was a famous study on this topic by SumoMe that was recently published by AWeber. The study tested the conversion rates of a popup opt-in that was introduced to new visitors at 3, 5, 10, 20 and 30 seconds. It found that the ideal time to wait before showing a popup to new visitors was exactly five seconds. The five second popup received 89% more email opt-ins than the time period that came in second place.
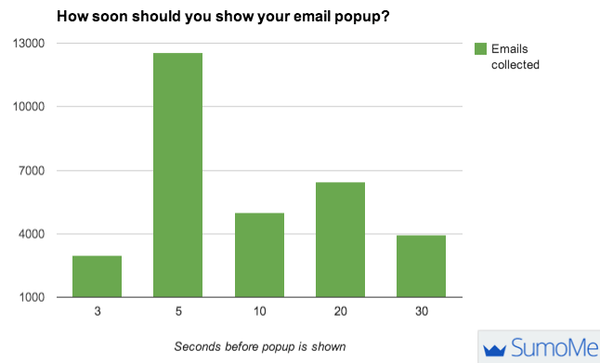
The reasoning behind this finding is twofold. On one hand, you do not want to introduce the popup immediately when someone comes to your blog for the first time. The natural psychological reaction to close out the popup tends to involuntary kick in with this circumstance. On the other hand, if you wait too long, then the visitor is too deep into reading your post. In this scenario, they close out the popup so that they can get back to the post.
The other tactic that is used for popup opt-ins is know as exit intent. All paid email opt-in services like OptInMonster and LeadPages offer this technology to their customers. Exit intent tracks the location of the mouse on the browser. When a new visitor moves their mouse off of your website, then it triggers the technology to launch the popup. This hits your visitors with your popup offer at the exact moment they are moving their mouse towards the back button on the internet browser.
When I first heard about this technology I was very excited. Just like with anything, I tested it out before blindly taking all of my timed popups down. What I found was pretty shocking. The exit intent popup received 30% less email opt-ins than the timed popup. This was a big enough difference for me to pass on using exit intent. For those of you that are still concerned about disrupting the flow of your blog with a popup, then the exit intent popup would be the perfect place to start.
The more specific your popup offer is to the post content, the higher your conversion rate will be. I personally like to use category specific popup offers. For example, I have a category on my blog that only has posts related to creating a slogan for your business. With this category, I use a popup that has a lead magnet directly related to slogans. The lead magnet is a general guide on how to create a slogan for a business. Whether the visitor is reading a post on real estate slogans or dentist office slogans, this lead magnet will remain relevant.
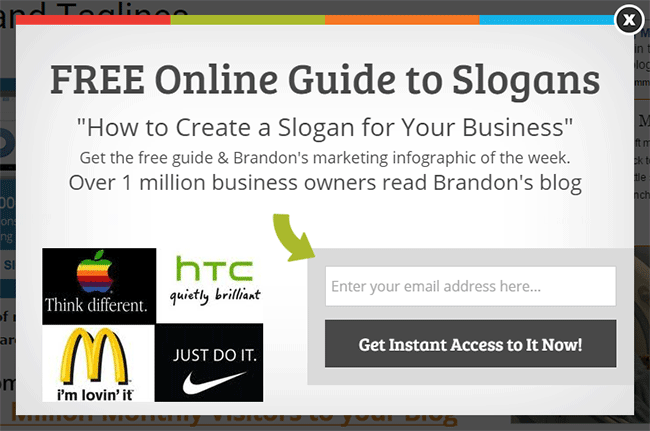
If your blog has eight main categories, then you can cover the entire site with eight lead magnets. The custom to category email opt-in offer will capture 700% more emails than a single site offer that is not customized. So, it is definitely worth the time to create individual lead magnets for every major category of your blog.
#2 The Customized End of the Post Email Opt-in
After the popup, the end of the post is the next best location to include an email opt-in. This location will not get you as many emails as a the popup. However, if you use it correctly, it will have the highest conversion rate of any opt-in on your site.
You might be a little confused after this statement. How can the end of the post have a higher conversion rate but capture less emails than the popup. There are two reasons for this…
- More People See the Popup Offer than the End of the Post Offer. On the average blog post, only 50 to 60 percent of visitors will read the entire post and see the end of the post opt-in.
- Not Every Post Will Have a Custom End of the Post Lead Magnet. The power of the end of the post opt-in is in having a custom lead magnet that is directly related to that specific post. This is referred to as a content upgrade. If your blog has hundreds or thousands of posts, you may only have enough time and resources to create content upgrades for the posts that receive the most visitors.
Let’s delve a little deeper into the content upgrade, which is essentially offering website visitors some more content related to the post in exchange for their email address. If your blog post is about ways to improve your SEO, then your upgrade may be a list of the 9 best SEO tools for bloggers. The best content upgrades are simple and hyper specific to the topic covered in the post.
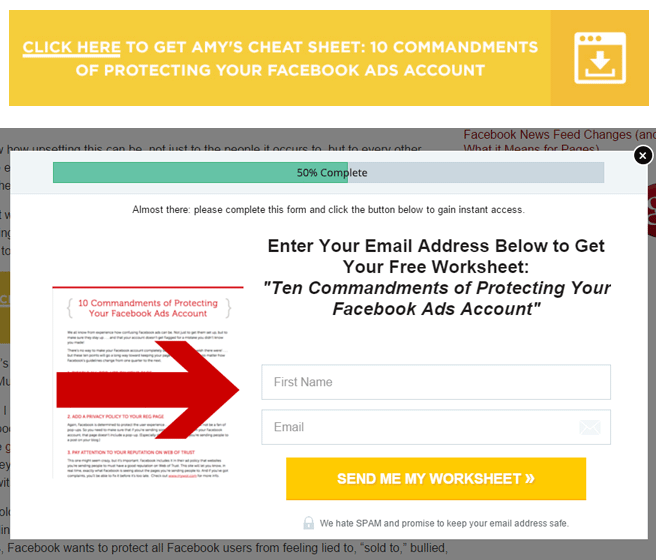
Here’s a great example of a two step, end of the post custom opt-in that Amy Porterfield used for one of her posts. The two step process simply shows a link to click, and when they click the link a popup comes up.
When a visitor reads your 1500 word post on SEO, then you have gained their trust. At that point, you are in the perfect position to ask them for their email address in exchange for some more great information on the post topic.
#3 The Simple Site Wide Floating Footer Email Opt-In
The footer location is a great spot to have a general site wide offer. This just means that the same opt-in offer will show up in the footer for every single post on the site. For that reason, you want to make sure the offer will be general enough to draw interest from everyone who is visiting your blog.
A good example of the copy used for a footer opt-in might be…
Join Over 100,000 People That Get Brandon’s Weekly Insider Marketing Secrets
I am using social proof to let people know that I have 100,000 subscribers, and I use the term “secrets” to draw value to signing up. Unfortunately, the most used copy for the footer opt-in is “Subscribe to My Email List.” This is the worst copy that you can use for any lead magnet. Take the time to make your copy compel visitors to sign up to receive your emails.
The footer opt-in should be timed to rise up after a new visitor has been on your site for about 30 seconds. This will act as another cue to get new visitors to sign up, and it will complement your 5 second popup offer. The footer will rise up and stick to the bottom of the browser. This makes it very unobtrusive and because of this it rarely gets closed out.
#4 The Old and True Side Bar Opt-in Lead Magnet
For nearly a decade from 1998 to 2007, the sidebar was the default location for signing up to an email list or old school rss feed. Although it does not convert as high as it used to, it is still a great location to add an email opt-in form.
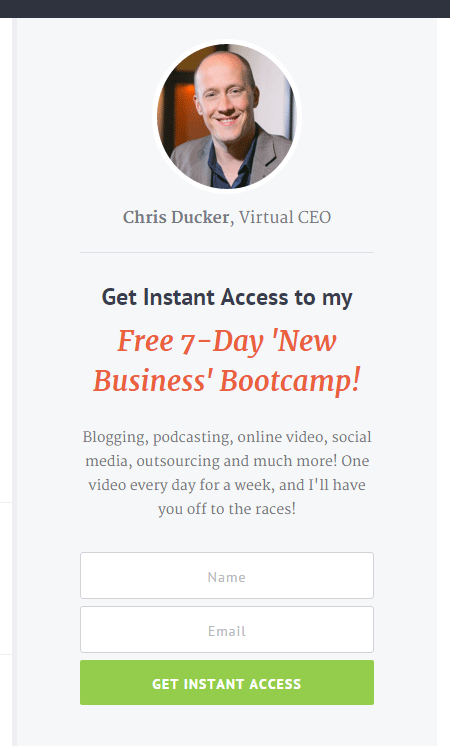
With the sidebar, it is best to use a vertical visual offer that pitches the lead magnet. The sidebar has grown in width over the last five years, and many sidebars have width that ranges from 300 to 400 pixels. I recommend making the height of your call-to-action banner between 400 and 750 pixels.
Chris Ducker is one blogger that does a great job executing sidebar email opt-ins. His sidebar opt-ins are right at 725 pixels in height.
Most sidebars utilize a single site wide offer. If you end up incorporating multiple site wide offers across different locations, then remember to not use the same lead magnet more than once. Most of the major blog properties will have an average of six email opt-ins on every page and post. However, each of the six opt-ins on these blogs use a unique lead magnet. This allows them to offer their visitors six different freebies to entice them to join their email list.
At this point, I have mentioned three strategies to pair with the four locations. Those three strategies are the site wide, custom to category, and custom to post email opt-ins. I did some research on how well each of these strategies have converted on my blog. These statistics cover the results obtained from actions taken by over 40 million visitors to my blog.
The site wide footer converted .23% of visitors. The custom to category popup converted 1.81% of visitors, and the custom to post after the post converting 7.73% of visitors.
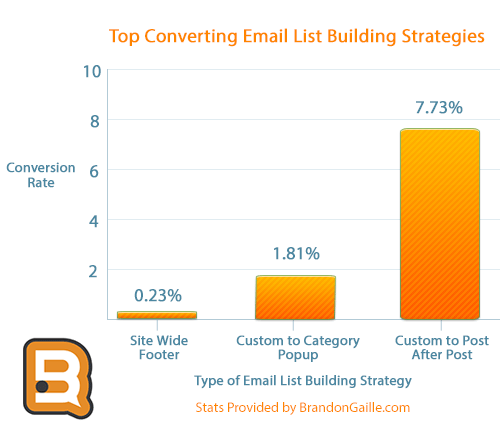
Let’s simplify these stats so that you can really understand how each strategy will impact your list growth.
For every 100,000 visitors here are the amount of emails that each strategy would obtain…
Site Wide Footer – 230 email subscribers
Custom to Category Popup – 1840 email subscribers
Custom to Post After Post – 7730 email subscribers
You can see the big difference that customization makes to the bottom line.
As I mentioned before, most blogs can execute the entire custom to category popup strategy with eight lead magnets. You do not have to overdo it with your lead magnets. It has been proven that a simple 400 word lead magnet will covert just as high as a 50,000 word ebook. In addition, only about 20% will ever get around to reading the entire 50,000 word ebook. Whereas, 100% will scan or read a 400 word list or cheat sheet.
The 3 Step Execution Strategy to Implement Everything I Covered
Here is my suggested execution strategy to turn your blog into an email list building machine.
Step 1 – Custom to Category Popups
Take a look at your Google analytics and identify the categories whose posts receive the most monthly visitors. Then start with your highest traffic category and work your way down until you have added a custom to category popup to every category with at least 1000 monthly visitors. Remember to time your popup to show after new visitors have been on a post for 5 seconds.
Step 2 – Site Wide Footer and Sidebar
This one is real easy to execute. Just spend some time on your copy, and never use copy that read “Sign Up to My Newsletter.” Set the site wide footer to rise up after new visitors have been on your blog for 30 seconds. Whereas the footer will promote what you deliver your email subscribers, I recommend using a lead magnet that appeals to your entire audience in your sidebar. This way you will have two site wide opt-ins that both have a unique pitch.
Step 3 – Custom to Post After Post
For the custom to post offers, I suggest that you start by creating a list of your posts that are ranked by the ones that receive the most traffic from Google search. You use Google search stats for the rankings because you do not want to include traffic spikes that occur from social sharing or email blasts. Once you have your list, then set a goal to create one new custom email capture a week for any post that receives at least 100 visitors. After a year you will have custom to post opt-ins on the 52 most visited posts on your blog.
One final tip… Do not over complicate your lead magnet creation. Just keep it simple and create 400 to 600 word lists posts that deliver big value for that specific topic. You can also publish each of these lead magnets as a standard blog post. This will allow you to keep your same blog posting schedule and work in topics that will be used for your lead magnets. When someone submits their email for the lead magnet, then just send them directly to the blog post that you created for that specific lead magnet.
Watch Today’s Masterclass Webinar, “How I Got to 1 Million Monthly Visitors,” to Bypass the Waitlist for my Exclusive Course & Get Two Bonuses Worth Over $5000
 [mc4wp_form id=”43544″]
Although millions of people visit Brandon's blog each month, his path to success was not easy. Go here to read his incredible story, "From Disabled and $500k in Debt to a Pro Blogger with 5 Million Monthly Visitors." If you want to send Brandon a quick message, then visit his contact page here.